
Generating your own custom IAR files of your Sitecore Items
Kamruz Jaman - Solution Architect
29 Nov 2023
In a previous post, my colleague had posted about Setting Up Sitecore Serialization using Sitecore CLI and Structuring your Sitecore Serialization Items. In this post I wanted to cover how to create your own Item As Resource files using both Sitecore Serialization and Unicorn.
As I mention in my previous post, the use of the Item As Resource (IAR) feature was released in Sitecore 10.1, but the Resource Package CLI plugin was not released until CLI v4.0.
The IAR files are files which store the default base Sitecore and module items, which have been serialised using Google Protocol Buffers (a.k.a. protobuf) format. Interestingly though, although this feature was only initially released in Sitecore 10.1, which was released in Feb 2012, it seems that it was developed (internally at Sitecore at least) around 4 years prior. There is a Github repo available with the original proof of concept with support for Sitecore 8.2!
There are a number of different options available for generating your own IAR files, no matter which serialization tool you are using. It’s often misunderstood this feature is only available when working with Sitecore Content Serialization.
Why generate your own IAR file?
There are many benefits to using IAR files:
- Build times are reduced since you no longer need to zip up all the Unicorn yml files and add it to the artifacts for deployment. This is often time consuming due to the sheer number of files.
- Deployments times are reduced since you no longer need to unzip the Unicorn files once they have been deployed, then wait for a sync
- The deployment process in general is much simpler - you are just deploying files, no need to worry about running an sync
- No publishing is required (from CM to CD)
- Helps simplify Green-Blue deployments
- Since you deploy the IAR files with the codebase, each specific instance could have new code and the new templates it depends on
- In a normal situation you may only have a single web database shared between both Blue and Green instances
- When you switch the instance, the code and templates/renderings etc all switch together as a single unit
- Helps to keep your databases lean and clean
- Rollbacks are super simple - no need for anti-packages or to go in and delete items, just revert to your previous deployment (or redeploy previous release) and the code and items are back to that initial state
- Simplifies upgrades of Sitecore and modules
Generally you will only want to generate IAR files of "developer" owned items, i.e. items such as templates, layouts, renderings, placeholders, perhaps some scaffolding and setting items.
How do we generate IAR files with Sitecore Content Serialization
If you are using Sitecore Content Serialization for your solution then you can generate IAR file using the CLI itemres command:
dotnet sitecore itemres create --output itemres/konabos --include tags:[konabos]
This will generate a file named items.master.konabos.dat in the ./itemres folder relative to the current directory.
If you are using Azure Build Pipelines then you follow this sample build step:
1steps:
2- task: PowerShell@2
3  displayName: Create Sitecore Item Resource Files
4  inputs:
5    targetType: 'inline'
6    script: |
7      dotnet tool restore --add-source https://nuget.sitecore.com/resources/v3/index.json
8      dotnet sitecore itemres create -o itemres/konabos -i tags:[konabos]
9      dotnet sitecore itemres create -o itemres/url -i tags:[url]
10      Write-Host `r`n"Copy itemres files to build output" -ForegroundColor Green
11      Copy-Item ".\itemres\items.core.*.dat" -Destination (New-Item "$(Build.ArtifactStagingDirectory)\website\App_Data\custom-items\core" -Force -ItemType "directory")
12      Copy-Item ".\itemres\items.master.*.dat" -Destination (New-Item "$(Build.ArtifactStagingDirectory)\website\App_Data\custom-items\master" -Force -ItemType "directory")
13      Copy-Item ".\itemres\items.master.*.dat" -Destination (New-Item "$(Build.ArtifactStagingDirectory)\website\App_Data\custom-items\web" -Force -ItemType "directory")
Note in that final line we are copying the Master.dat file to the web folder. We haven't renamed the file to items.web.*.dat in this above example for brevity. The use of tags is also very useful if you wish to create distinct files for different configurations/modules.
And that's it for our build pipeline step in Azure DevOps. Since we only use this CLI feature to generate the IAR file, and we are not using any of the other features like Publishing, Indexing etc, we do not require to install the Sitecore Management Service module on our CM instance. This really is all there is to it.
Now just publish your Build Artifact in the build pipeline and deploy as you would the rest of the code. Very simple right!
How do we generate IAR files with Unicorn
It is also just as easy to generate IAR files if you are using Unicorn serialization, which is not surprisingly given that SCS uses almost the same Rainbow serialization format.
The CLI command for Unicorn is very slightly different:
dotnet sitecore itemres unicorn --path "../Serialization" --output "itemres/konbabos" --overwrite --verbose
Very similar, except we need to pass in the Path parameter with the location of our serialized items on disk.
There is however one issue which I have noticed which has required a workaround when building the IAR files, otherwise you may see an error similar to this:
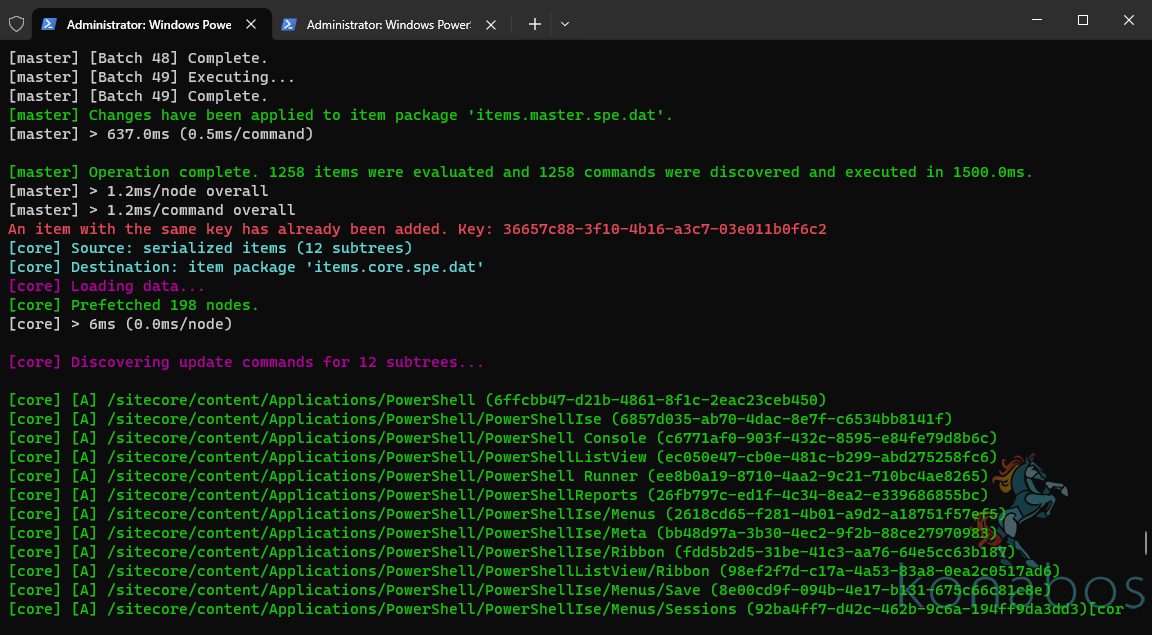
An item with the same key has already been added. Key: 36657c88-3f10-4b16-a3c7-03e011b0f6c2
However, if we search the files in the Serialization folder then you will not find this duplicate item. There seems to be a slight bug with the CLI that it cannot handle non-contiguous item paths. For example, if one config serialized a parent item path and only that parent item path, and another serialized a set of child folders to a different folder location then the CLI seems to think that there are items that are duplicated and serialized twice.
The trick I found to make this work was to re-structure those items so they all sit in a single and continuous folder location on disk, i.e. create a script to move the items into a new folder structure. This very specific issue in the case of the SPE module is that Script Library parent node was in one folder, but the SPE scripts that are nested under that sit in another.
Below if a sample script which we have successfully used with slight modification on multiple projects.
1[CmdletBinding()]
2param (
3 [ValidateScript({ Test-Path $_ -PathType Container })]
4 [string]$OutputLocation
5)
6
7Set-Location $PSScriptRoot
8Write-Host `r`n"Generate IAR file from Unicorn items" -ForegroundColor Green
9
10dotnet nuget add source -n "Sitecore NuGet Feed" https://nuget.sitecore.com/resources/v3/index.json
11dotnet new tool-manifest
12dotnet tool install Sitecore.CLI --version 5.2.113
13dotnet sitecore init
14
15# There is a bug in Sitecore CLI which does not like non-contigious item path,
16# so we will just MOVE and RENAME it to the "correct" location
17Move-Item -Path "./SPE/Scripts" -Destination "./SPE/Core/Module/PowerShell/Script Library" -Force
18
19# Create the IAR files
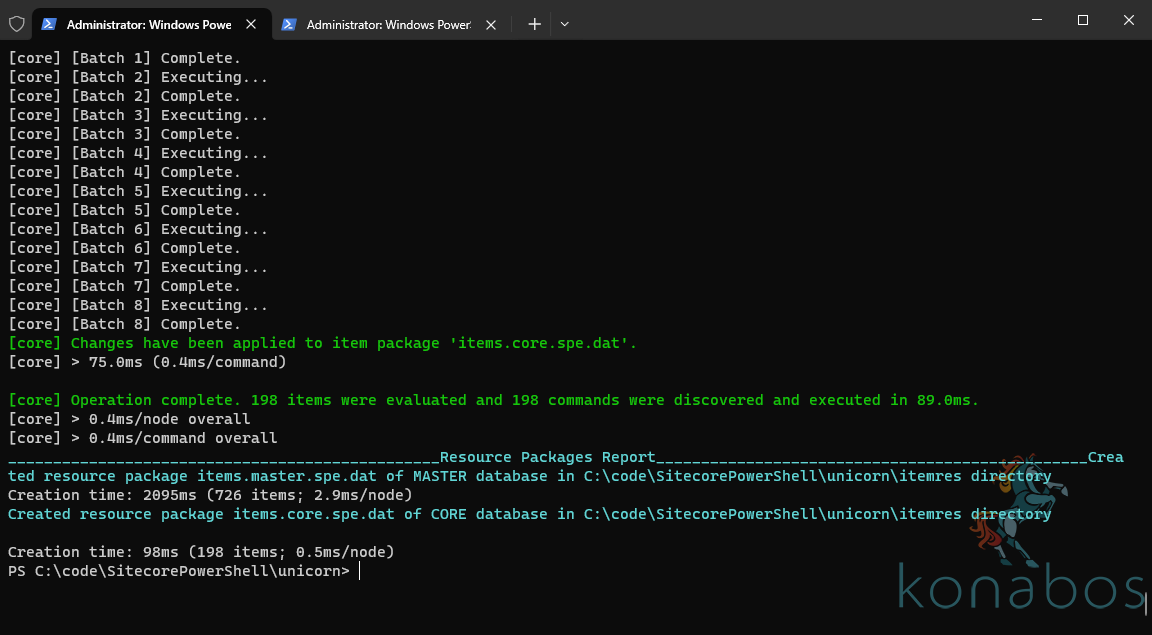
20dotnet sitecore itemres unicorn -p "./SPE" -o "itemres/spe" --overwrite --verbose
21
22if (-not [string]::IsNullOrEmpty($OutputLocation)) {
23 Write-Host `r`n"Copy itemres files to build output" -ForegroundColor Green
24 Copy-Item ".\itemres\items.core.spe.dat" -Destination (New-Item "$OutputLocation\website\App_Data\custom-items\core" -Force -ItemType "directory")
25 Copy-Item ".\itemres\items.master.spe.dat" -Destination (New-Item "$OutputLocation\website\App_Data\custom-items\master" -Force -ItemType "directory")
26 New-Item "$OutputLocation\website\App_Data\custom-items\web" -Force -ItemType "directory"
27 Copy-Item ".\itemres\items.master.spe.dat" -Destination "$OutputLocation\website\App_Data\custom-items\web\items.web.spe.dat"
28}You can then call this script from your DevOps build pipeline:
1- task: PowerShell@2
2  displayName: Create Sitecore Item Resource Files
3  inputs:
4    filePath: '.\.build\build-iar.ps1'
5    arguments: '-OutputLocation $(Build.ArtifactStagingDirectory)'
Again, you do not require the Management Services module to be installed on the CM. You'll also notice here though that we install the CLI tool and run a sitecore init command. Since we do not require the CLI tool for our everyday serialization process, we only care about installing it during the devops build process. This also keeps our repo cleaner, not having to check-in any configuration files for the tooling or related modules.
Success!
How do we generate IAR files with TDS
What?!?! Yes, it is possible to generate IAR files with TDS, and this was actually the first tool that was able to generate IAR files. Yes, even before the CLI!

This may be useful for those that are transitioning and working through an upgrade process, but we highly recommend that solutions switch to using SCS as soon as possible, and using the Sitecore for Visual Studio plugin for a GUI based interface.
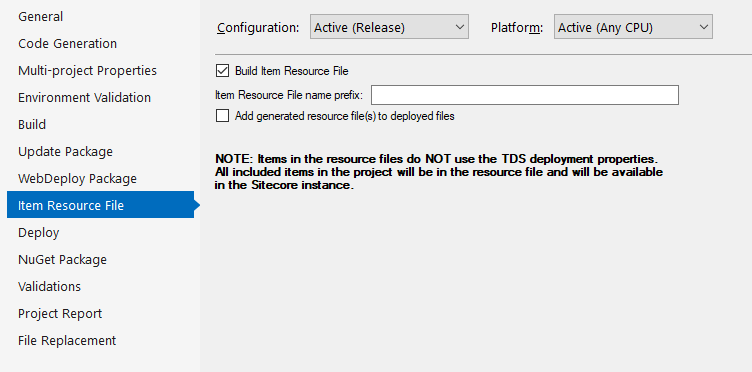
You can read more about this in the documentation.
Patching the locations of the IAR files
There are 2 default locations specified in the dataprovider where the IAR files are loaded from:
1<database id="master" singleInstance="true" type="Sitecore.Data.DefaultDatabase, Sitecore.Kernel" role:require="Standalone or Reporting or Processing or ContentManagement">
2  <dataProviders hint="list:AddDataProvider">
3    <dataProvider type="Sitecore.Data.DataProviders.CompositeDataProvider, Sitecore.Kernel">
4      <param desc="readOnlyDataProviders" hint="list">
5        <protobufItems type="Sitecore.Data.DataProviders.ReadOnly.Protobuf.ProtobufDataProvider, Sitecore.Kernel">
6          <filePaths hint="list">
7
 <filePath>$(dataFolder)/items/$(id)</filePath>
8
 <modulesFilePath>/sitecore modules/items/$(id)</modulesFilePath>
9          </filePaths>
10        </protobufItems>
11      </param>
12      ...
13    </dataProvider>
14  </dataProviders>
15  ...
16</database>
I highly recommend that you patch the dataproviders and add in a new location for your custom IAR files. This will ensure that they are loaded after the default Sitecore and module protobuf files. The following patch will work for 10.2+:
1<database id="master" role:require="Standalone or ContentManagement">
2  <dataProviders>
3    <dataProvider>
4      <param desc="readOnlyDataProviders">
5        <protobufItems>
6          <filePaths>
7
 <customFilePath>/App_Data/custom-items/$(id)</customFilePath>
8          </filePaths>
9        </protobufItems>
10      </param>
11    </dataProvider>
12  </dataProviders>
13</database>
For Sitecore 10.1 only the patch is slightly different, you can patch like this, be sure to set the name property on the node:
1<database id="master" role:require="Standalone or ContentManagement">
2  <dataProviders>
3    <dataProvider>
4      <param desc="readOnlyDataProviders">
5        <protobufItems>
6          <filePaths>
7
 <filePath name="custom">/App_Data/custom-items/$(id)</filePath>
8          </filePaths>
9        </protobufItems>
10      </param>
11    </dataProvider>
12  </dataProviders>
13</database>
Clean up your existing instance
If you are upgrading an existing project, then all your items are probably synced to the database in the traditional way. If you then want to start using IAR files you will want to delete the items from the database itself so that they are instead fetch from the .dat file.
Once you have deployed, you should using the CLI cleanup tool, which cleas up the database items contained in the .dat files if both the item in the IAR file and the database are the same.
dotnet sitecore itemres cleanup
You can learn more here: https://doc.sitecore.com/xp/en/developers/101/developer-tools/the-cli-itemres-command.html#the-cleanup-subcommand
Content Editor Warnings
Be sure to also check out this useful extension by fellow MVP Jan Bluemink, which displays a nice Editor Warning so the developers know which items are in IAR files: https://www.stockpick.nl/sitecore/item-as-resources-powershell-warning/
That was pretty simple right?
Hopefully this shows that the creation of custom Item as Resource files is quite straight forward, and there is support for it in all the Serialization Tooling options that are available for Sitecore. If you are going through an upgrade process or building a new solution then I highly recommend that you use the IAR files feature for the ease of use and the simplicity that it adds to all steps of the build and deployment process.
Hope this was insightful. Please reach out if you have any comments or need any help!

Kamruz Jaman
Kamruz is a 14-time Sitecore MVP who has worked with the Sitecore platform for more than a decade and has over 20 years of development and architecture experience using the Microsoft technology stack. Kamruz is heavily involved in the Sitecore Community and has spoken at various User Groups and Conferences. As one of the managing partners of Konabos Inc, Kamruz will work closely with clients to ensure projects are successfully delivered to a high standard.
Share on social media