Setting Up Sitecore Serialization using Sitecore CLI
Elena Petrashen - Senior Sitecore Developer
17 Aug 2022
The objective of this post is to provide a step-by-step guide to setting up Sitecore serialization in your solution as well as tips on using Sitecore CLI for one’s daily use cases, specifically using tags.
Setting up Sitecore Serialization: Initial steps
Before you begin, please make sure you are on Sitecore version 10.0 or later – Sitecore Serialization is not available for earlier versions. You will also need to have .Net Core 3.1 installed on your server.
Sitecore Management Services package installation
- The first step before you start any of the activities in the Visual Studio is to download Sitecore Management Services package from Sitecore’s website: https://dev.sitecore.net/Downloads/Sitecore_CLI.aspx.
- Install it on your Sitecore instance using Sitecore Control Panel > Install a package.
Getting Started with Sitecore CLI
Now, we will go through using Sitecore CLI as the location to perform serialization-related actions. There may be different preferences for using a Terminal vs a Visual Interface, but one of the significant advantages of Sitecore CLI is that you do not have to purchase the TDS license. If you prefer the visual experience, then you can purchase a license for Sitecore for Visual Studio (at the moment Sitecore for Visual Studio uses the same license as Sitecore TDS) and continue work within the IDE.
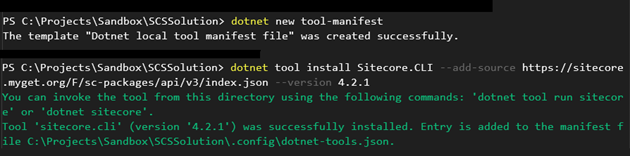
Sitecore CLI Installation
Open the PowerShell console or View -> Terminal console in your Visual Studio and change the directory to a folder where you want the serialization to occur. That will most likely be the root of your solution. Install Sitecore CLI by performing the following commands:
1dotnet new tool-manifest
2dotnet tool install Sitecore.CLI --add-source https://sitecore.myget.org/F/sc-packages/api/v3/index.jsonNote: At the time of writing (July 2022) the latest available version of SSC, version 5.1.0, was for beta use only and some of the things end up not working, so in the screenshot (fourth line) I specified that I required Sitecore SCS version 4.2.1.
Initialization
Next, we need to initialize our new serialization project. Enter the following in the console:
1dotnet sitecore initThis will create the root configuration file for serialization: sitecore.json
1{
2  "$schema": "./.sitecore/schemas/RootConfigurationFile.schema.json",
3  "modules": [
4    "./TODO/*.module.json"
5  ],
6  "plugins": [
7    "Sitecore.DevEx.Extensibility.Serialization@4.2.0",
8    "Sitecore.DevEx.Extensibility.Publishing@4.2.0",
9    "Sitecore.DevEx.Extensibility.Indexing@4.2.0",
10    "Sitecore.DevEx.Extensibility.ResourcePackage@4.2.0"
11  ],
12  "serialization": {
13    "defaultMaxRelativeItemPathLength": 100,
14    "defaultModuleRelativeSerializationPath": "serialization",
15    "removeOrphansForRoles": true,
16    "continueOnItemFailure": false,
17    "excludedFields": []
18  }
19}
Looking at the “plugins” section you can see all the Sitecore Serialization plugins that were installed automatically. In my experience that was not always the case. If you do not have plugins listed in your sitecore.json go ahead with installing them on your own.
Note: For the initial use case where we only want to serialize and publish items, serialization and publishing plugins will be required.
1dotnet sitecore plugin add -n Sitecore.DevEx.Extensibility.Serialization
2dotnet sitecore plugin add -n Sitecore.DevEx.Extensibility.Publishing
Here is the list of plugins that may be installed:
- Indexing plugin – includes index command to automate indexing operations
- Items as Resources plugin - includes itemres command to allow creation of an item package in a resource file with configurable options.
- Publishing plugin – includes publish command
- Serialization plugin – provides ser command to serialize items
Connecting to Sitecore
To connect to a Sitecore instance type in the following:
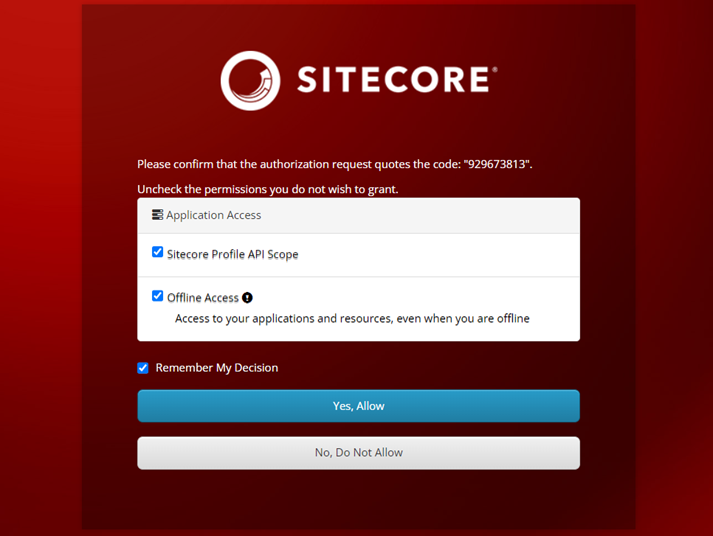
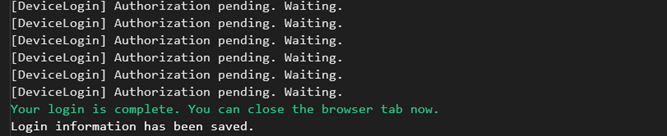
1dotnet sitecore login --authority https://<Sitecore identity server> --cm https://<Sitecore instance> --allow-write trueThis should open your Sitecore instance login screen in a browser tab. Once you log in, be sure to allow access:
You will see a confirmation message in your terminal:
Creating modules
It is time to configure which content items are included and excluded from serialization.
We select subsets of the Sitecore content tree that need to be part of the project by creating Project.module.json files and placing includes and rules there.
Here is my SCSSolution.Content.module.json:
1{
2    "namespace": "SCSSolution.Content",
3    "description": "Content for local development only",
4    "tags": ["content"],
5    "items": {
6        "includes": [
7
 {
8
     "name": "SCSSolution.SiteContent",
9
     "path": "/sitecore/content/SCSSolution",
10"rules": [
11
        {
12
           "path": "/legacy",
13
           "scope": "ignored"
14
        }
15      ]
16
    },
17
 {
18     "name": "SCSSolution.MediaLibrary",
19
     "path": "/sitecore/media library/Images/SCSSolution"
20
 },
21
 {
22
     "name": "SCSSolution.Sampleitem",
23
     "path": "/sitecore/sampleCoreItem",
24"database": "core",
25"scope": "SingleItem"
26
 },
27
28        ]
29    }
30}
The above sample includes all the content for the SCSSolution folder in the content tree and media library, except for the “/legacy” subtree which we chose to “ignore”. The possible properties for an "include" are:
- name (required) - it will be the name of the folder that is created to store the serialized items in your module serialization folder.
- path (required) - path to the item subtree in Sitecore
- scope – configure what content items are influenced by serialization – whether it is only the item itself(SingleItem), or it is ItemAndChildren, ItemAndDescendants (default option), or DescendantsOnly. There is also an option to set it as Ignored – however only on “rules” level, that will not work for “includes”.
- database - core or master, with master being the default option
- maxRelativePathLength – the default value is 130
- AllowedPushOperations - this parameter may be used to indicate whether you want to allow overwriting items in Sitecore. Possible values are: No, CreateOnly, CreateAndUpdate, and CreateUpdateAndDelete, with CreateUpdateAndDelete being the default one
Note that the order of the includes within the module is important, e.g. if you have some content items dependent on a template in the same module, your template must be listed first.
You would need to include the reference to your *.module.json files in the “modules” section of your sitecore.json too.
1{
2  "$schema": "./.sitecore/schemas/RootConfigurationFile.schema.json",
3  "modules": [
4"./src/Feature.SCSSolution.Navigation/SCSSolution.Navigation.module.json",
5"./src/Project.SCSSolution.Web/SCSSolution.Content.module.json",
6  ],
7  "plugins": [
8    "Sitecore.DevEx.Extensibility.Serialization@4.2.0",
9  ],
10  "serialization": {
11    "defaultMaxRelativeItemPathLength": 100,
12    "defaultModuleRelativeSerializationPath": "serialization",
13  }
14}
After this is done, you can start serializing. You should be able to run “dotnet sitecore ser” commands with pull and push arguments to get items from Sitecore to disk/push serialized items from disk to overwrite Sitecore’s state, respectively.
1dotnet sitecore ser pull
2
3dotnet sitecore ser push
Adjusting configuration
In another post, I have covered several ways you may want to structure your serialized items to be stored within the solution; and how to achieve this by modifying your SCS module/config files.
Excluding unnecessary files
You will notice some new files in your solution folder after this process – e.g. .scindex files, .sitecore/ folder. These can be added to .gitignore.
If you run into issues with your serialization after doing this, try running:
1dotnet tool restoreThe dotnet tool restore command will find the tool manifest file that is in scope for the current directory and install back the tools that are listed in it.
Note: Make sure not to commit the .sitecore\user.json file to source control as it contains privileged information.
If all 6 steps have been completed, you should now have Sitecore Serialization working for your solution.
Congratulations!
TIP: It might be time to check out Sitecore documentation for a thorough description of all the commands available in Sitecore CLI 😊
Making more targeted changes with Tags
If you like checking out release notes for the new releases of various technologies, you may notice that the 4.1. release of SCS has module tagging added in. Here are some of the use cases you might find for this functionality:
- When developing, you want to periodically pull updates for your templates, but not content
- You only want to deploy templates and renderings etc to a higher-level instance to avoid overwriting test content created by QA
- You only care about changes in some particular piece of business logic and you only want to deploy changes for that one on your local
For example, here is how you would set it up to have your content tagged separately to exclude it from being synchronized.
Your “content” module.json:
1{
2    "namespace": "SCSSolution.Content",
3    "description": "Content for local development only",
4    "tags": ["content"],
5    "items": {
6        "includes": [
7
 {
8
     "name": " SCSSolution.Content",
9
     "path": "/sitecore/content/SCSSolution"
10
 },
11
 {
12
     "name": " SCSSolution.Medialibrary",
13
     "path": "/sitecore/media library/Images/SCSSolution"
14
 }
15        ]
16    }
17}
Your “non-content” module.json:
1{
2    "namespace": "SCSSolution.Navigation",
3    "description": "Developer owned system level items related to navigation",
4    "tags": ["navigation"],
5    "items": {
6        "path": "~/serialization/$(module)",
7        "includes": [
8
 {
9
     "name": "SCSSolution.Templates",
10
     "path": "/sitecore/templates/SCSSolution/Navigation"
11
 }
12        ]
13    }
14}
Pulling to get updates for system items, but not content from Sitecore:
dotnet sitecore ser pull --include tags:[navigation,pagecontent]
Or
dotnet sitecore ser pull --exclude tags:[content]
Pushing updates for system items, but not content to Sitecore:
dotnet sitecore ser push --exclude tags:[content]
Note that the tags cannot have a space in their name, and when you address them as list command arguments you should use a comma delimiter. The list should also not contain spaces after the comma like this: [TagA, TagB]
You can use tags in the other settings where you need more flexibility on what modules should be included or excluded. For example, here is how to refer to specific tags in your Azure pipeline when deploying to higher-level environments:
1dotnet sitecore itemres create -o itemres/scssolution -i tags:[scssolution]Conclusion
As you can see, the process of installation and configuration for Sitecore Serialization is very straightforward, and it doesn’t have to be a “pull/push everything at once” solution, as it may seem. You can make the changes much more targeted by specifying tags in your modules’ configuration files. Serialization may also be considered for replacing TDS (in tandem with a third-party code-generation library like Leprechaun) so you do not need to have a TDS license when you use Sitecore CLI.

Share on social media