How to add custom connection strings to your Sitecore instance on Docker
Lukasz Skowroński - Senior Solutions Architect
27 Jan 2025
These days, developers must often be able to switch quickly between the projects they are working on. To achieve this, they can install their Sitecore instances on their workstations and then play with configuration to run multiple instances in parallel. The other option is docker, which also requires configuration but allows dev teams to maintain OOTB configuration because instances are isolated inside Docker containers.
Isolation of containers is a game changer but also sets some challenges to overcome. In this article we will cover the case of adding custom connection string to Sitecore instance, and how to achieve it in accordance with best practices.
We assume that you have already setup your local containers and you are familiar with Docker concepts. For more information about basic setup you can visit the following documentation page: https://doc.sitecore.com/xp/en/developers/latest/developer-tools/containers-in-sitecore-development.html
General flow
Before we dive into the configuration details we want to explain to you the general flow of how configuration will be adjusted and what you should understand to follow the next steps of this article.
Sitecore provides images for all of the Sitecore Server Roles. These images can be configured with some environment settings.
Some of the images even though are preconfigured, may require more dynamic configuration to be injected, for this reason you should understand how to use a Dockerfile files.
Whole Sitecore environment on docker is composed thanks to docker-compose file where you will find definition of the containers and networks that make communication between containers possible.
Some of the containers will have your local folders attached so the data can be reused at the container level. You should know that ConnectionStrings.config file will not be there.
Sitecore in containers uses config builder to inject environment settings into the solution and configuration – we will use it to inject our connection to custom database. (https://learn.microsoft.com/en-us/aspnet/config-builder)
First step – add your connection string to docker
Inside your docker-compose file you will find cm service section where in environment parameters you should see something similar to:
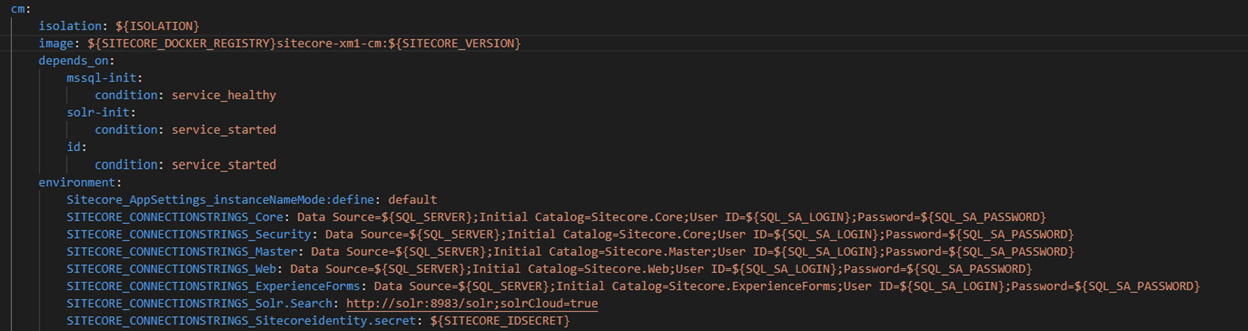
You can see there familiar connection strings to core, master, web and other databases.
If you think that this seems to be the right place to add your custom connection string – you are correct. You can add your connection string as we added our test connection here:
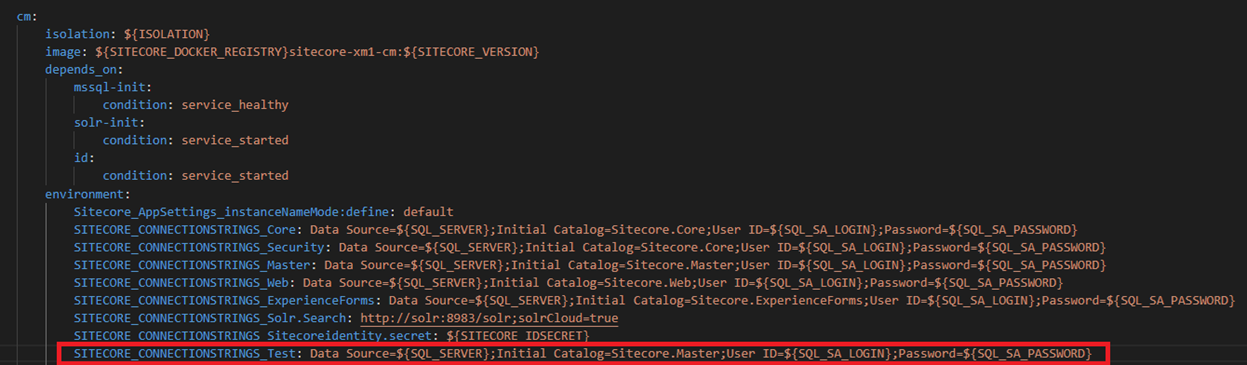
At this point you should notice prefix which is added to all of the connection strings – “SITECORE_CONNECTIONSTRINGS_”. This prefix is required by Sitecore configuration builder and is removed when connection string is registered in Sitecore.
That could be the end – but due to the multiple reasons, unknown to Sitecore connection strings cannot be registered without doing some additional steps.
Second step – register your connection string
Registration of the connection strings happens thanks to the configuration that you will find inside your web.config file:

You will find there also a prefix that we used in the previous step. If you pay more attention to this configuration you will find there also a mode attribute which is set to mode “Strict”. This mode registers only well-known key-value pairs.
You will find more information about it here:
https://learn.microsoft.com/en-us/aspnet/config-builder#mode
We have to change it so we can add our own connection strings and to do this, we will use transformation of the web.config file. We created a file called web.docker.config and placed it into the docker build cm folder:

Inside that file, we define a transformation to replace the mode from strict to greedy for SitecoreConnectionStringsBuilder.
At this point we have all what we need – from Sitecore’s perspective. We are still missing a docker part to connect all of that at the docker image and container level.
Third step – docker to run the transformation
Transformation has to be called once – at the time image is created. It means that the right place to configure this change is Dockerfile file.
Go to the docker file from the CM directory and add market parts of the code:
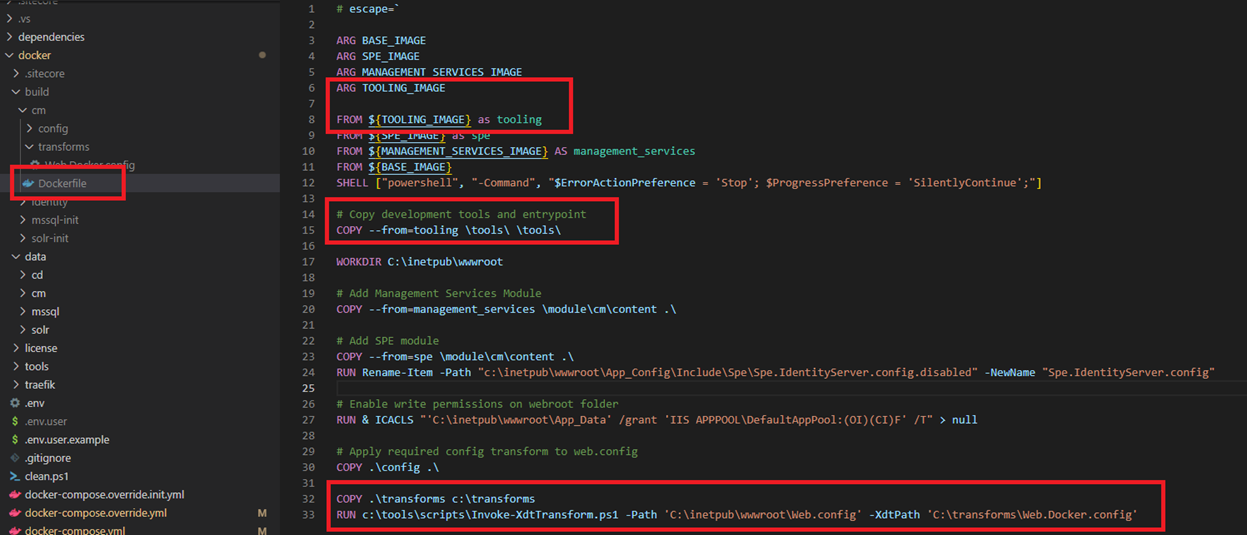
With these changes you will register powershell scripts provided by Sitecore that we will use to run the transformation.
Then the last lines will copy transforms folder form your local environment into the image under the C:\transforms directory.
The last line runs the transformation on web.config file.
With all that you are ready to run docker compose -up and start using your custom connection string.
Forth step – verification
Your connection string will not be visible in any files. You may ask yourself – how can I check if my connection string is properly registered?
Thanks to Sitecore Powershell Extensions you can do that with a simple script. Open you SPE IDE inside Sitecore panel and call a following script (remember to replace “Test” with name of your connection string):
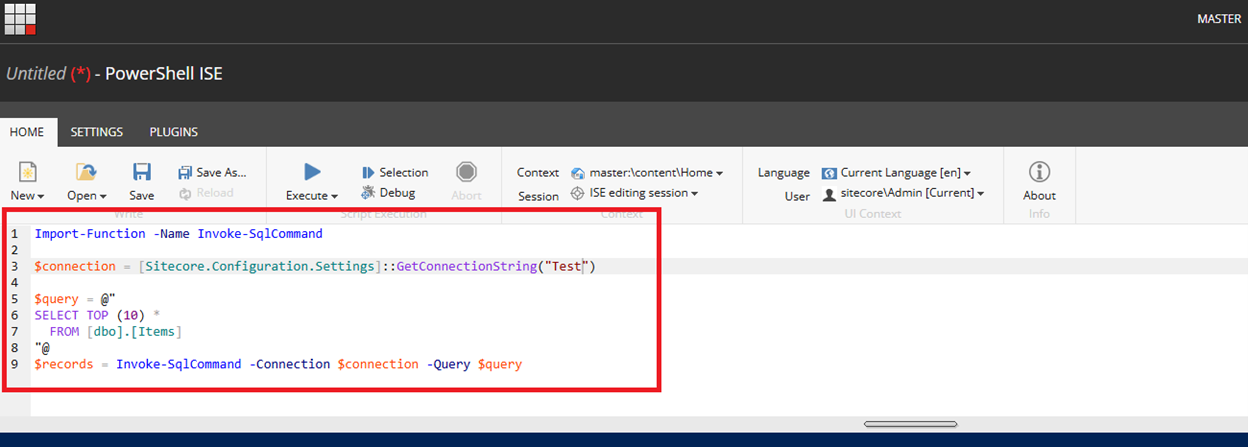
When results are returned – everything is fine and you can start using your database on the code level.
In this article, we presented a way to add a connection string, but you can also use the same approach to add AppSettings or other environment settings.
You can also do much more with transformations that you should already know as a Sitecore developer. You are limited only by your imagination.

Lukasz Skowroński
For over 18 years, I have developed numerous solutions for customers worldwide. I specialize in DXP platforms, including Sitecore, Xperience by Kentico, and various CMSs such as Umbraco. So far, I have been awarded nine times with the Sitecore MVP title, once with the Kentico MVP. I continuously support various communities by organizing local user groups and larger conferences like Sitecore User Group Conference Europe (SUGCON Europe), as well as by sharing knowledge through blog posts.
Share on social media