
Sitecore deployment on AWS virtual servers with the help of Jenkins and Nexus Repository Manager
Lukasz Skowroński - Senior Solutions Architect
20 Sep 2023
This article is part of the series discussing topics related to the Sitecore upgrade project we have done recently at Konabos. One of our goals was to set up fully automated Sitecore deployment – read on if you are interested in the details of that process.
Because our customer had some experience with Jenkins we decided to use the full potential of it and pair it together with Nexus Repository Manager. We used Jenkins to build the process and automate it and Nexus Repository Manager was used to store all of the artifacts created by Jenkins.
We built two very similar but different processes:
- The first one for scaled environments (blue/green deployment)
- The second one is for smaller environments
Both processes are divided into phases that have to be triggered manually for better control and flexibility.
The first phase is always the preparation of the artifact. Because it runs MSBuild, it can also be used to verify if the latest changes contain any errors. It always runs the build on the clean repository and tries to restore all of the NuGet packages used in the solution. If the build was successful we do some additional movement of the files that should be stored in better organized directories as we prepare the zip file that is uploaded to the Nexus Repository. In this phase, all of the actions are processed by the Jenkins Agent on the dedicated server. This means that none of the servers being used to serve websites are impacted in any way.

As you may notice we do not have a direct connection between phase 1 and phase 2. It is designed that way because we wanted to have the option to run the build without running deploy and also to be able to define in phase 2 which artifact (a result of phase 1) should be deployed. It means that we can select previous artifacts to deploy them on the server if the latest introduced some breaking changes.
Phase 2 is responsible for deployment only. Architecture on the server level for that phase is a bit more tricky than in phase 1.
For Phase 1 we selected option 2 from the 3 listed below options:
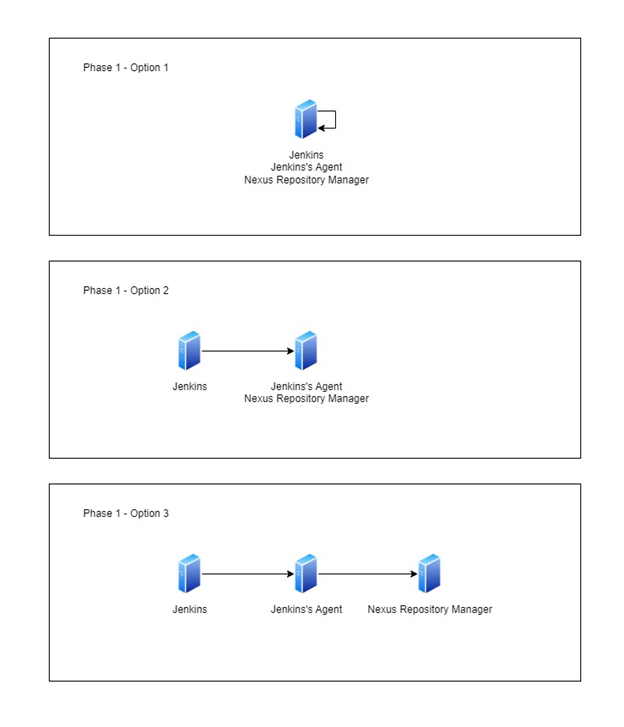
It means that Jenkins uses an agent on a separate server to process all of the actions and connect to the Nexus Repository that is installed on the same server. The Jenkins server is not affected by performance issues when the build is processed by the agent.
In the Phase 2 (a.k.a. deployment) situation may look like on the image:

In our case, because we made a decision to use option 2, we had a simpler architecture than in the case of option 3. What is interesting about this image is the fact that Jenkins does not connect to any of the servers.
Connection is always established between the Jenkins Agent and the servers. The Jenkins Agent connects to the remote servers to run their scripts that are used to process deployment steps and to download artifacts from the Nexus Repository – yes, artifacts are downloaded by the scripts on every single server, not on the agent’s server.
Now when we have an understanding of the simplified release cycle we can add on top of it details that cover part of the blue/green deployment.
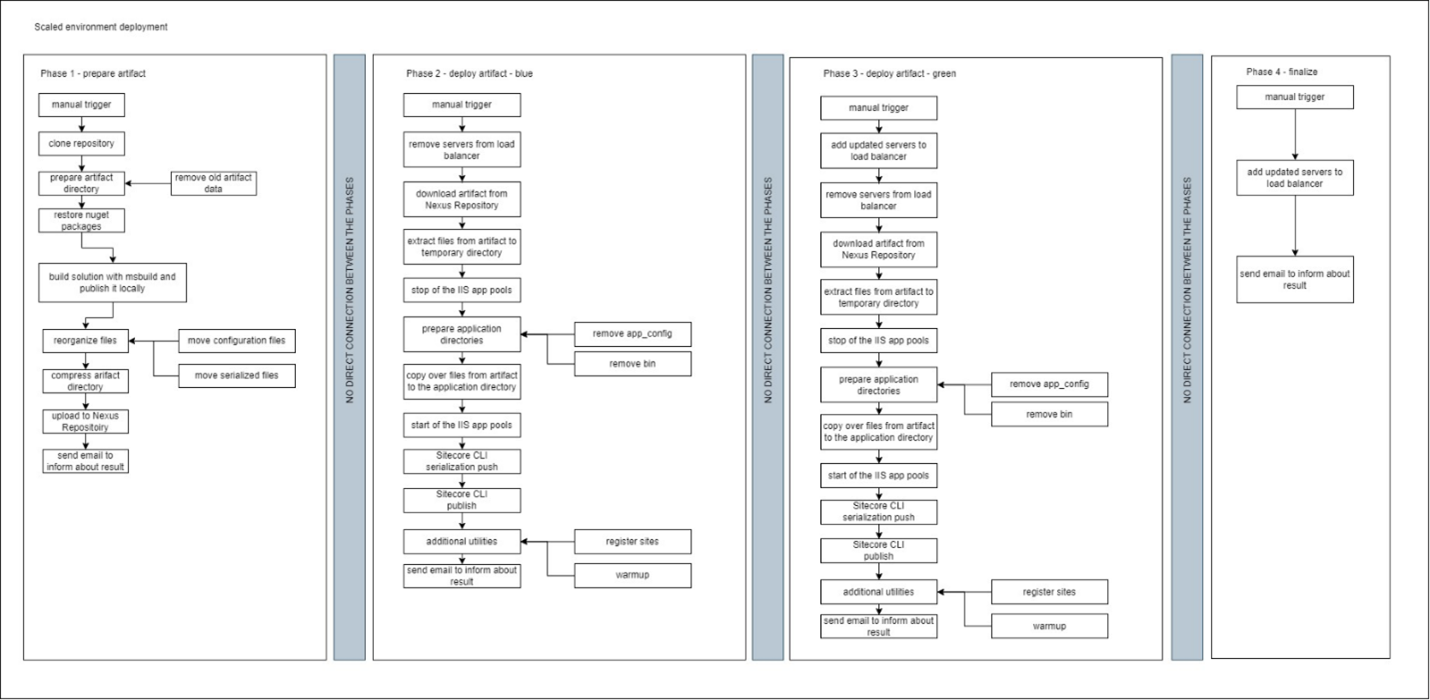
The first difference that you may notice is the number of phases. We do have two deployment steps that contain additional operations executed on the load balancers. The servers before being updated have to be removed from the load balancer so visitors can see only verified content. We also added a final step to create all of the removed servers back onto the load balancers.
The process shown on the diagram would not be possible without adding new publishing targets on the Sitecore backend:
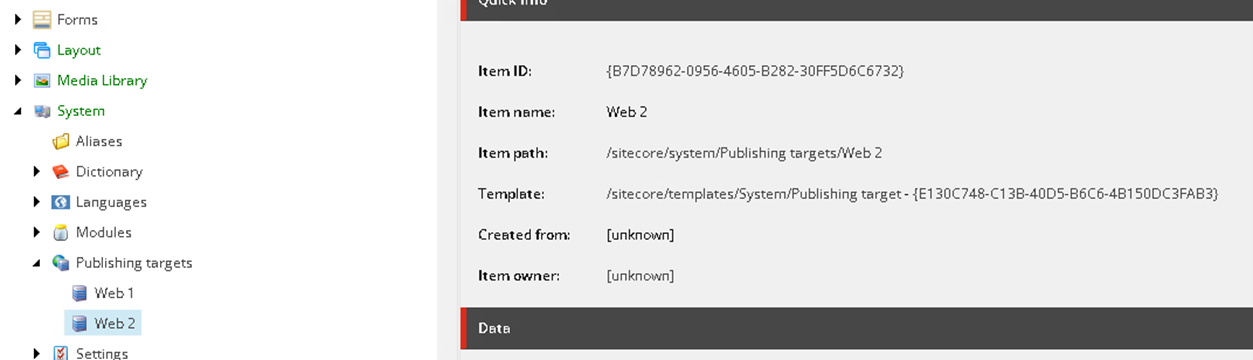
With the second target we could configure Sitecore CDs in the way that content delivery servers from the blue part of the environment were connected to the “Web 1” and content delivery servers from the green part of the environment were connected to the “Web 2”. During the deployment, when there is a need to publish the data we can safely do that without the risk that someone will see not tested data or the new data will break the website with the old code not ready for data changes.
Summary
The process of deployment is usually built from multiple smaller steps – sometimes not-so-obvious steps. This article covers a bare minimum that we think should be done to build really useful and automated CI/CD processes. We could easily extend a list of steps with some warmup scripts of Sitecore websites or additional tests being triggered during the build or before/after deployment. Every team and project is different so feel free to treat shared knowledge as a starting template for your own perfect deployment process.

Lukasz Skowroński
For over 18 years, I have developed numerous solutions for customers worldwide. I specialize in DXP platforms, including Sitecore, Xperience by Kentico, and various CMSs such as Umbraco. So far, I have been awarded nine times with the Sitecore MVP title, once with the Kentico MVP. I continuously support various communities by organizing local user groups and larger conferences like Sitecore User Group Conference Europe (SUGCON Europe), as well as by sharing knowledge through blog posts.
Share on social media