Upgrade Sitecore Experience Commerce 9.0 Update-2 to Update-3
Akshay Sura - Partner
4 Dec 2018
Sitecore Experience Commerce 9.0 Update 3 was released today (December 4th, 2018). This post outlines the process of upgrading Update 2 to Update 3 as described in the Sitecore Experience Commerce Upgrade Guide. We will only concentrate on the engine upgrade and not the SXA Storefront upgrade.
- First, Download the XC 9.0 Update-3 software from XC 9.0 Update-3 release package
- Extract Sitecore.Commerce.2018.12-2.4.63.zip in a folder, I am extracting mine in c:\resourcefiles folder.
- Extract Sitecore.Commerce.Engine.2.4.63.zip.
- Extract Sitecore.Commerce.Engine.SDK.2.4.43.zip.
- Extract Sitecore.BizFX.1.4.1.zip
- Disable the following files in c:\inetpub\wwwroot\SITENAME\App_Config\Include\Y.Commerce.Engine folder: Sitecore.Commerce.Engine.Connectors.Index.Common.config Sitecore.Commerce.Engine.Connectors.Index.Solr.config Sitecore.Commerce.Engine.DataProvider.config
- Update the Commerce Engine binaries: Open Internet Information Services (IIS) Manager, and stop the following Commerce Engine sites: CommerceAuthoring, CommerceMinions, CommerceOps, CommerceShops stop the CommerceMinions_SC9 application pool.
- Copy all the files and folders from the extracted Extract Sitecore.Commerce.Engine.2.4.63.zip file, EXCEPT the wwwroot folder and replace them in the following folders: c:\inetpub\wwwroot\CommerceAuthoring_Sc9 c:\inetpub\wwwroot\CommerceShops_Sc9 c:\inetpub\wwwroot\CommerceMinions_Sc9 c:\inetpub\wwwroot\CommerceOps_Sc9
- Update policy set configuration: If you did not customize your Sitecore XC 9.0 Update-2 policy set files, copy all policy set files in the wwwroot\data\Environments folder from the extracted Sitecore.Commerce.Engine.2.4.63.zip file and replace them in the following folders: c:\inetpub\wwwroot\CommerceAuthoring_Sc9 c:\inetpub\wwwroot\CommerceShops_Sc9 c:\inetpub\wwwroot\CommerceMinions_Sc9 c:\inetpub\wwwroot\CommerceOps_Sc9
- If you have some customizations in the environment files like adding a new environment etc, please do a file compare with the new configuration files (Plugin..CommerceAuthoring-1.0.0.json, PlugIn..CommerceMinions-1.0.0.json,PlugIn.*.CommerceShops-1.0.0.json) and make appropriate changes.
- Update global policy configuration: If you have made changes to the global.json file, please do a file compare with the global.json from the extracted Sitecore.Commerce.Engine.SDK.2.4.43.zip file and make appropriate changes. “Version”: “9.0.3” was added.
- Disable the anti-forgery setting temporarily by setting “AntiForgeryEnabled”: false in \inetpub\wwwroot\CommerceAuthoring_Sc9\wwwroot\config.json file.
- Upgrade the database schema: To upgrade the Sitecore XC SQL database schema with the changes contained in this release, run the following scripts from the extracted Sitecore.Commerce.Engine.SDK.2.4.43.zip file: Run SitecoreCommerce9.0.3_SchemaUpgrade.sql against the global and shared environment databases. Run SitecoreCommerce9.0.3_CleanParentIds.sql against the shared environment database. Run SitecoreCommerce9.0.3_BuildMappings.sql against the shared environment database. Run SitecoreCommerce9.0.3_BuildVariantIdsOnMappings.sql against the shared environment database.
- Update Commerce Connect Core: Navigate to the \inetpub\wwwroot\SITENAME\App_Config\Include\Y.Commerce.Engine folder andrename the following (disabled) files to enable them: Sitecore.Commerce.Engine.DataProvider.config Sitecore.Commerce.Engine.DataProvider.config Sitecore.Commerce.Engine.Connectors.Index.Common.config Sitecore.Commerce.Engine.Connectors.Index.Solr..config (or all Sitecore.Commerce.Engine.Connectors.Index.Azure..config files if your deployment uses the Azure search provider.)
- Login to Sitecore, launch the Sitecore Installer, and install the Sitecore Commerce Connect Core 11.4.15.zip package. Select overwrite existing files and Merge & Clear when prompted.
- Use the Sitecore Installer to install the following packages (if you are prompted to overwrite existing files, click Yes to all. If prompted to overwrite items, select Merge and Clear, and click Apply to all): Sitecore Commerce ExperienceProfile Core 11.4.15.zip Sitecore Commerce ExperienceAnalytics Core 11.4.15.zip Sitecore Commerce Marketing Automation Core 11.4.15.zip Sitecore Commerce Marketing Automation for AutomationEngine 11.4.15.zip
- Backup \inetpub\wwwroot\SITENAME\App_Config\Include\Y.Commerce.Engine folder.
- Delete contents of \inetpub\wwwroot\SITENAME\App_Config\Include\Y.Commerce.Engine folder.
- Reset IIS.
- Open /sitecore/admin/UpdateInstallationWizard.aspx and install Sitecore.Commerce.Engine.Connect.2.4.32.update
- Make sure the information (especially the thumbprint) in the
\inetpub\wwwroot\SITENAME\App_Config\Include\Y.Commerce.Engine\Sitecore.Commerce.Engine.Connect.configfile are correct.- < certificateThumbprint > 2B99AEA9BDEDD8BB69E9881220531E0CA99950D4 </ certificateThumbprint >
- <!-- StoreLoctions:
- CurrentUser = 1
- LocalMachine = 2
- -->
- < certificateStoreLocation > 2 </ certificateStoreLocation >
- <!-- StoreNames:
- AddressBook = 1
- AuthRoot = 2
- CertificateAuthority = 3
- Disallowed = 4
- My = 5
- Root = 6
- TrustedPeople = 7
- TrustedPublisher = 8
- -->
- < certificateStoreName > 6 </ certificateStoreName > If you dont, you will see an error similar to this:
- 5800 21 : 20 : 07 INFO Commerce . Connector - Acquiring mapping lock
- 5800 21 : 20 : 07 INFO Commerce . Connector - Mapping locked
- 6856 21 : 20 : 07 ERROR Authentication Error
- Exception : System . Exception
- Message: The certificate thumbprint is invalid or missing from your configuration, secure communication with the Commerce Engine is not possible.
22. Navigate to the \inetpub\wwwroot\SITENAME\App_Config\Include\Y.Commerce.Engine folder and rename the following (disabled) files to enable them: Sitecore.Commerce.Engine.DataProvider.config Sitecore.Commerce.Engine.DataProvider.config Sitecore.Commerce.Engine.Connectors.Index.Common.config Sitecore.Commerce.Engine.Connectors.Index.Solr..config (or all Sitecore.Commerce.Engine.Connectors.Index.Azure..config files if your deployment uses the Azure search provider.)
23. Clear out all the collections from your Postman.
24. Import Postman scripts from the extracted Sitecore.Commerce.Engine.SDK.2.4.43.zip file.
24. Get the token in Postman by opening the script from the Authentication folder.
25. Open and run the Upgrade Catalog Relationships request from the Upgrade /Migration folder under SitecoreCommerce_DevOps folder.
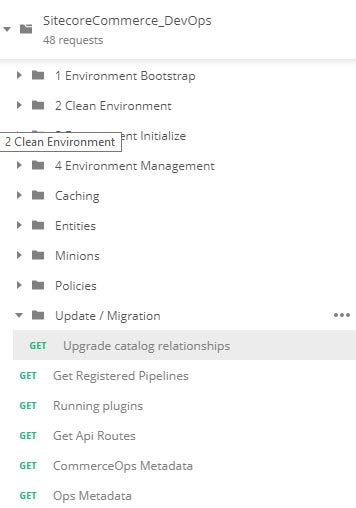
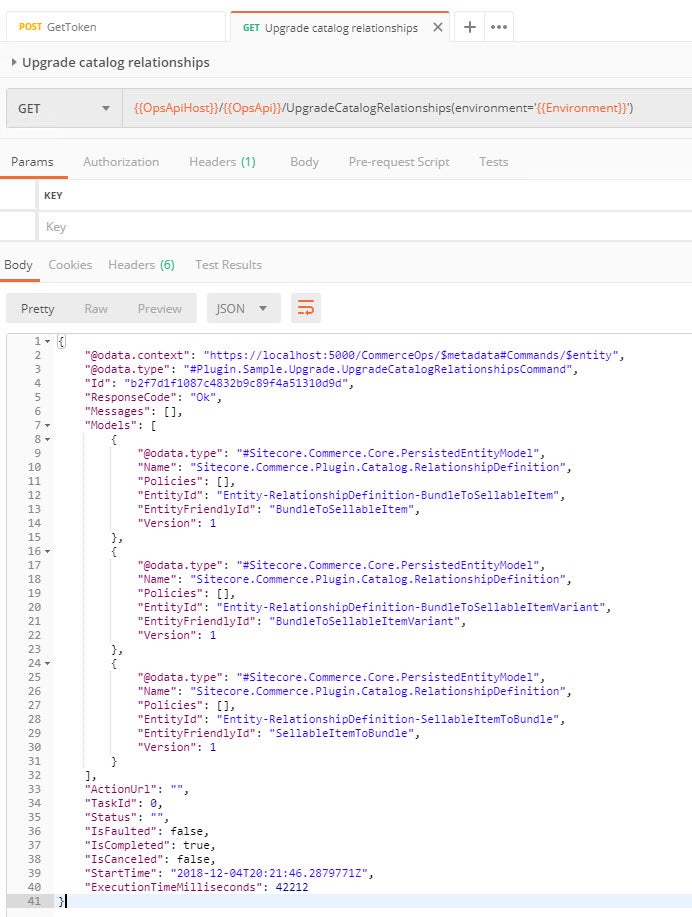
26. Get a token in Postman.
27. Bootstrap the Commerce Engine by running the script from the SitecoreCommerce_DevOps folder.
28. IIS Reset.
29. Synchronize Control Panel content Items: In my case, I had not synchronized the Control Panel content items. So I ran the Ensure\Sync in the Environment Initialize folder in DevOps. Check the status by running the Check Long Running Command Status.
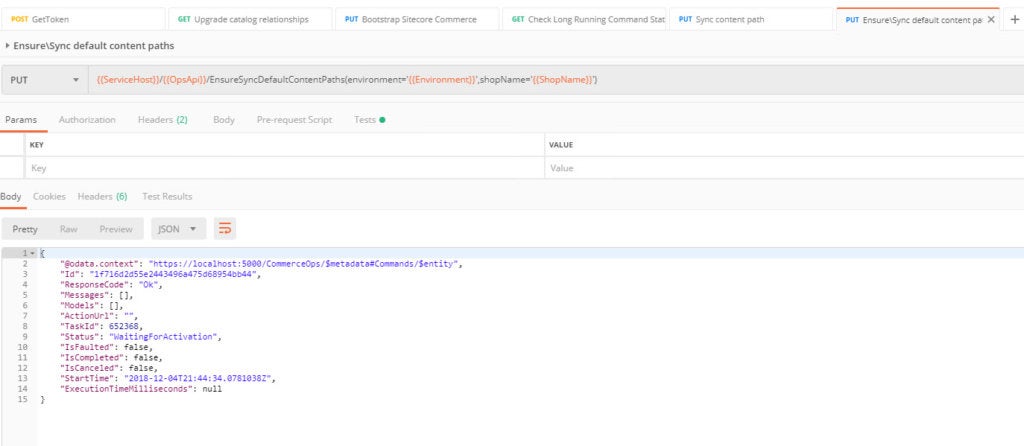

30. Update the data templates by deleting the data templates and updating the data templates as shown in the picture below:

31. Update Commerce Connect XConnect configuration: Copy \inetpub\wwwroot\SITENAME\XConnectModels\Sitecore.Commerce.Connect.XConnect.Models.json file and replace the files in \inetpub\wwwroot\SITENAME.xconnect\App_data\jobs\continuous\IndexWorker\App_data\Models and \inetpub\wwwroot\SITENAME.xconnect\App_data\Models
32. IIS Reset.
33. Clean the Solr cores by running the two commands below: t
https://<host:port>/solr/SITENAME_master_index/update?stream.body=<delete><query>*:*</query></delete>&commit=true<br/>https://<host:port>/solr/SITENAME_web_index/update?stream.body=<delete><query>*:*</query></delete>&commit=true
34. Login to Sitecore and do a full republish of the site (NOT SMART PUBLISH).
35. Use the Indexing manager to reindex sitecore_core_index, sitecore_master_index and sitecore_web_index
36. Enable the anti-forgery setting by setting “AntiForgeryEnabled”: true in \inetpub\wwwroot\CommerceAuthoring_Sc9\wwwroot\config.json file.
37. Upgrade Commerce Business Tools: Stop the SitecoreBizFx site Delete the contents of the inetpub\wwwroot\SitecoreBizFx\assets folder. Copy all of the files from the extracted Sitecore.BizFX.1.4.1.zip package into the inetpub\wwwroot\SitecoreBizFx folder. Restart the SitecoreBizFx site.
38. Login to your Business Tool and confirm everything is working.
Links: Sitecore Experience Commerce Upgrade Guide
If you have any questions or concerns, please get in touch with me. (@akshaysura13 on Twitter or on Slack).

Akshay Sura
Akshay is a nine-time Sitecore MVP and a two-time Kontent.ai. In addition to his work as a solution architect, Akshay is also one of the founders of SUGCON North America 2015, SUGCON India 2018 & 2019, Unofficial Sitecore Training, and Sitecore Slack.
Akshay founded and continues to run the Sitecore Hackathon. As one of the founding partners of Konabos Consulting, Akshay will continue to work with clients to lead projects and mentor their existing teams.


Share on social media